TO STRANGLIFY A WESTONE THUNDER 1-A BASS.
| This is part of my effort to make sounds like the Stranglers' bass, as heard on the first three LP's. It explains HOW. If you find the WHY likely to be more interesting, try this. This work is public domain. Use it any way you like, but indicate where you got it if you re-publish any of it. A new section is added here, with a schematic and circuit details. Please use this link if posting it elsewhere. |
|
|
The pictures here can be seen as full-screen images in Internet Explorer v4-0 or higher, and maybe with other browsers (with possible side-effects), if JavaScript is enabled. Click the image to see it at full scale, and then either double-click, or press the ESC key, to return. If your browser does not support those methods of closing, use Alt + F4, which is guaranteed to do it. If your screen resolution is lower than 1024x768 pixels, the pictures will be too large, but you can still see every part of the image by clicking on it and then dragging toward the part you want to see. You can still open the images directly to view in full scale without JavaScript, but it's not as flash that way. | |
RE-FRETTING: |
|
|
There will be other ways to do this, and maybe even people who will violently disagree with parts of this method, but it worked extremely well for me, and I'd never re-fretted a guitar before, so if you're good with accurate tooling this should work well enough. The result I got looks as if the neck had never seen any frets other than the ones I just put there. There is no sign of any wear or damage that cannot be accounted for by the years of playing which made this bass need new frets. The guitar to be re-fretted: Westone Thunder 1-A by Matsumoku of Japan, 1983, a mass produced but excellent derivative of a Fender Precision Bass that when well kept, improves steadily with age and is built well enough to last a century. With active electronics and a dual pair of pickups, it is ideal for making many sound variations, being especially good at the complex timbre made by JJ Burnel of the Stranglers due to its structure, a steel truss rod in a rock maple neck with a rosewood fingerboard and an ash body. It maintains tuning very well, almost as well as a graphite neck! It sounds a lot better too. I have refretted two of these basses now. I like having backups... Find the radius of the guitar's neck. There are special gauges, but I improvised a method by casting plaster onto two places, one at each end of the fingerboard. I measured the chord formed by the width of the board and the height of the arc above that chord, and calculated radius as follows: (Height^2+Length^2/4)/(2*Height) from the 'intersecting chords theorem', or try Length^2/Height/8+Height/2, but I don't understand how that one works. Make sure your units are in inches before using the formula. |

Plaster casts of the fingerboard to find its radius.
|
Get as many frets as you need, pre-radiused, cut to short lengths ready to use. Jescar Stainless Steel Fretwire FW58118-S Electric Super Jumbo Pre-radiused. 10 inch radius. Keep them clean, do not handle till you fit them, and then only touch the end you'll be cutting off. Avoiding contamination makes things much easier to get right. Use the biggest frets you can get for a bass, and use stainless steel, not nickel. It has nickel in anyway, it's just a lot tougher, so will last longer than standard nickel alloy frets. Use a small rag wet with linseed oil, but not dripping with it, to clean the fingerboard and soak into it to ease fret removal. After several minutes, wipe the oil off before removing the frets. |

Bass with tools, and with frets removed and neck cleaned.
|
To remove them, do it as described by Alsop Guitars, using their re-fretting tools, or something similar, gripping the side, not forcing the fret pullers under the fret. Work carefully from one end of the fret to the other, levering it up and out gently until it is free. If the puller jaws bite under the fret, it will likely pull up too fast and stress the wood and cause splinters. To control the motion, try to avoid that overbite. Use the protector strip to help prevent damage to the fingerboard, and to help maintain control by anchoring the side of the fret puller jaws as you lever the fret out. |

Close view of the fingerboard, showing minimal slot wear.
|
Sand the fingerboard carefully, lightly but firmly, just enough to flatten the board so that by running fingertips lightly along it afterwards, little if any stepped resistance is felt as the light grip passes across the slots. |

Detail of how the frets fit well with the neck radius.
|
Guide each new fret into position using a flat surface held beside the edge of the fingerboard. A small hardwood block is ideal, and will also be used to fix the fret in place. The new fret should be pre-radiused and cut for convenience and accuracy, and laid into the slot so one end reaches the guided edge. Rest the neck on a firm surface that won't scratch it, it must be supported under the slot about to be filled, to prevent stress while working on it. Gently lower the fret into the slot, then use the hardwood block to get it fully placed there, using very gentle impacts from a moderately heavy hammer on the top of the small block's end while moving the other end steadily along the fret to transfer the force of the impacts to make sure it is at full depth along its full length. It is best to do this lightly in a few passes rather than try to fit one end first. |

A fast precision cutter makes an easy and accurate result.
|
When all frets are placed as described above, use a small high speed rotary tool to finish the work. Proxxon and Dremel make such tools, but I like the Proxxon 'IBS/E' tool with the metal business end, it runs very smoothly even at the highest speeds. Go fast enough to avoid getting impatient with the slowness, but never go faster than about 10000 RPM. A thin carborundum disk will cut the excess end very close to the edge of the fingerboard. Use bright light and a magnifier to be sure of precision. Cut half-way through the first fret, then halfway through the next. Finish the first, then go halfway through the third before finishing the second, etc... This prevents too much heat building up. A little heat is good, it helps embed the new fret securely, but too much is bad. If you can see or smell smoke or fumes, leave that fret and return to it later. |

Drum and bass. Sorry, but I like puns entirely too much.
|
Finally, use a sanding drum to finish the fret end detail because it gets right up to the edge of the fingerboard with no noticeable damage, and the drum will erode at the edge to form a frayed cloth that helps you de-burr and polish the ends while avoiding damage to the wood while working the tool at the awkward angles needed to round off and polish the fret ends. |

Close detail of how I like the frets to be. No harm done.
|
Don't overdo this finishing detail, just take off enough edge so you can run a hand firmly along the fingerboard edge without hurting or damaging your hand. Don't be tempted to smooth it any further, that will happen anyway when you play it. It will take time, but that's what you want it to do! If it's too smooth, the string will often slip right off the side of the fingerboard if you play strongly. The aim is to get the best result that will last a long time. There should be no need to do any levelling or sanding of frets after fitting them if you're using correctly radiused wide fret wires that fit firmly against the surface of the fingerboard. If that surface is cleaned and in good order beforehand, the results of this simple method will work extremely well. This is certainly true for a bass guitar, and the method will also minimise any levelling and sanding needed even on the thinnest frets on any guitar. The trick is to be extremely careful when removing the old frets, and sanding the board afterwards to make sure the slots are not obstructed by any raised material at their edges or by any loose splinters falling into the slots. If you get that right, the rest will easily follow, and the entire job will likely take no longer than a few hours. |
NUT MODIFICATION: |

An earlier detail that becomes very significant now...
|
The fret height may be greater than the original frets, never mind any wear they had. A Westone Thunder 1-A, for example, has nickel frets 1.0 mm high, and when replacing them with 1.5 mm high stainless steel, the nut height is too low. Many guitars have a 'first fret' just forward of the nut, and replacing that with the rest solves all, but in this case the nut itself must be raised. |

Copper, indium solder and resin flux to raise the nut.
|
The nut on the Westone Thunder 1-A is brass, and I had some 0.5 mm thick copper sheet. The ideal way to fix the sheet to the nut is to solder it, and while awkward, I have a few low-temperature indium based solders (from soldering laser parts). I chose one for 231 °F (110.5 °C), an eutectic mix of 52% indium, 48% tin. This temperature is low enough that it will work without burning any residual glue left on the nut, and the bond will be extremely secure at any temperature the guitar will be ok with. |

The nut, removed, cleaned, and with resin flux coating.
|
The metal surfaces are cleaned and ground with emery cloth placed on a flat board. A resin flux is used to keep the surfaces clean and unoxidised, and will help the solder flow and bond to them. The copper is cut ready for the nut but left attached to the main sheet at one end to make it easy to handle, and is laid on a hot plate with a few tiny shavings of solder laid into the flux on the sheet. |

The indium/tin solder melting at 231 °F (110.5 °C).
|
When it melts, scrape it around gently with a dental pick, then lay the fluxed surface of the nut down onto it, slide it into precise position and press down, squeezing out the surplus solder and flux. |

A slow, very stable cooling process to fix the nut.
|
Weight the nut gently but firmly in place with something previously selected to do this effectively (I used a panel-beater's iron because it works better than most things I have). Allow the metal to cool slowly to room temperature before handling. |

The raised nut, cleaned, ready to replace on the neck.
|
When the nut is soldered to the copper sheet, cut the assembly off the sheet and carefully finish it by filing the edges of the copper using strokes that do not risk peeling it off the brass. When the nut is cleaned, use a thin film of superglue (cyanoacrylate) to hold it in place. There may be better glues for this, but superglue is easily cracked apart and filed away if later adjustment is needed, but secure if it is not, and if it is hard to remove later, a little heat directly applied to the nut will solve the problem easily and without damage. |

The result of re-fretting and fitting the raised nut.
|
The main thing about this method is that it is entirely reversible at need, without harm, but is also secure enough to last the lifetime of the instrument, and produces an attractive high quality result. A little filing of the slots in the nut may be needed to get a consistent low and easy action when Rotosound RS66LD roundwound strings replace whatever was originally there, but if you do this, do it very gently and TEST it equally carefully too, making sure that it plays how you need it to. It's easy to remove metal, but almost impossible to undo that action. |
OTHER ADJUSTMENTS: |

Two views of the neck after truss rod adjustment.
|
The extra 0.5 mm height of the strings makes it necessary to tighten the truss rod to balance the tension, but the extra strain is very minimal. I aim for a fingerboard that is almost straight but with a very slight increase in concavity toward the tuning end, as viewed along it from the other end. Judge this curvature only after 24 hours settling time. When first adjusting, the curve will extend roughly equally along the neck, but it settles into a nice exponential curve with time. It's better to adjust in small amounts than to have to back off because the neck was straightened and compressed too much. The slight concavity prevents excessive fret buzz in a low action. Any style will benefit from this detail, it's not just a Stranglers' bass thing... |

Detail of saddle height, strings in flat alignment.
|
The saddle height needs adjusting to get the strings into the same flat plane at the bridge end, and not following the neck radius. This is a small compromise that aims to make playing easier, as it is on the flatter, wider neck of the Status Graphite basses. The action is low, but not to the point of excessive fret buzz or dead notes anywhere on the string. The height is greater than it was originally, but when playing near the bridge this is a big advantage, a mis-strike is less likely to leave you with bleeding knuckles. |

Guide to intonation adjustment, but refine it by ear.
|
The Westone Thunder 1-A bass is mass produced, so having set up one guitar, copying the adjustments by eye to another one is valid because it saves a lot of time. The result is so close that it is less likely that loosening the strings will be needed each time a small change to saddle height or intonation is needed. Intonation will need fine tuning by ear, but it is easier to think about that if you don't have to fiddle about as much when you do it. |

Extra foam behind the pick-ups will make them secure.
|
The original foam settles and does not recover its form. The stuff I used is much better, it came from a motor vehicle parts shop. It's about 0.8 mm thick, double sided sticky foam tape, and unlike PVC electrical tape its adhesive does not dry out or ooze or seep after long periods of heating or pressure. I've used it to anchor a HeNe laser tube, and those things get hot. The foam tape's dimensional stability is very good. (So good that directional stability in the laser remained solid for years.) I stuck four layers of it together on top of the existing foam, leaving its green protective film on the top to avoid trouble getting the pick-ups out again if I ever need to. |

Details of pick-up height and of the string alignment.
|
The pick-ups should not waggle about, nor be under too much pressure. Precision is hard to gauge, I just checked for a few things as I did it. Distortion in sound by excessive closeless, loss of dynamics by excessive distance, balance in intensity of sound between strings, collision of strings with pickup when playing strongly, all these things must be taken into account. It's not so much a perfect balance (there isn't one), it's enough that none of these things is offensively wrong. Gauge this by sound, not by sight. |

View of electronic controls, not as useful as I hoped.
|
The switches are set for active electronics (powered, by two 9V PP3 batteries), with the two pick-ups in series, always. The volume (left-most knob) is always fully up. This makes sure that the output resistance is LOW, which eliminates microphony in the cable. It's easy to adjust input gain on the pre-amp, and this is best practise for low noise anyway. In my case I found that playing strongly sometimes caused an unpleasant flatulent distortion that was inherent to the guitar's electronics. Playing hard with a heavy pick close to the bridge can put out nearly 1000 millivolts from a Thunder 1-A bass, enough to overwhelm most guitar amp inputs. I could turn the guitar volume down but this won't help much, and cable microphony is the worst of the two evils because it can pick up physical vibrations, cause uncontrolled feedback from a loud amp, and pick up RF noise from things like mobile phones. Keeping the guitar volume control fully up puts the active circuit's low output resistance across the signal cable, resulting in a strong low noise drive for the external amplifier. Two fixes for excess clipping may be applied. One is to make a potential divider with two resistors in the pre-amp input's end of the cable. I used 100K in series to the input, and 22K from there to ground. This is fiddly, but a Neutrik jack will accomodate it, and this improves signal to noise ratio and dynamic range in general, always a good thing... The other fix is to scale the bass's own active pre-amp output by modifying its op-amp's closed loop gain, but I chose not to interfere with that. Last but not least, the tone controls... A lot depends on the compression, overdrive and EQ (in that order, at least in my Oberheim GM-400 it has to be so). I usually keep the settings constant. I start the passive tone (middle knob) at full, then put the edge of my thumb over the nearest point to the strings as I grip it, and roll it back to get my thumb centred on that point. I do the same for the active tone control (right-most knob) but start that one from its mid detent position. I gauged it by ear, but once settled on a sound, it's faster to check the control position by eye, and this method really helps to make things clear if other conditions are affecting the sound! This works very well, a strong, guttural and earthy balance of sound, bright as well as heavy. It snaps and snarls and with new strings is as close to a Stranglers sound as I know how to get. And if you want to play 'In The Shadows', just roll both tone controls as leftwards as they will go, leaving your external gear as it is. The Westone Thunder 1-A is VERY good at Stranglers bass sounds. |
ACTIVE TONE CONTROL CIRCUIT: |
|
There are wiring diagrams for the pickups, output jack, two switches and three variable resistors all over the net, so I will not put one here. There are calls all over the net for the schematic for the small active tone control's circuit board, and no-one has ever published one, so that's what I'm putting here. If you want to post it elsewhere, please link to this page! Google is NOT helping me to find visitors, and despite posting original content I make myself, this remains true, so if this is relevant and helpful to you and people you know, please tell them by linking to this page. That way people will likely see related stuff of interest, with or without Google's 'help'. If I get no help, I'm not likely to go to much effort to make any new content. |
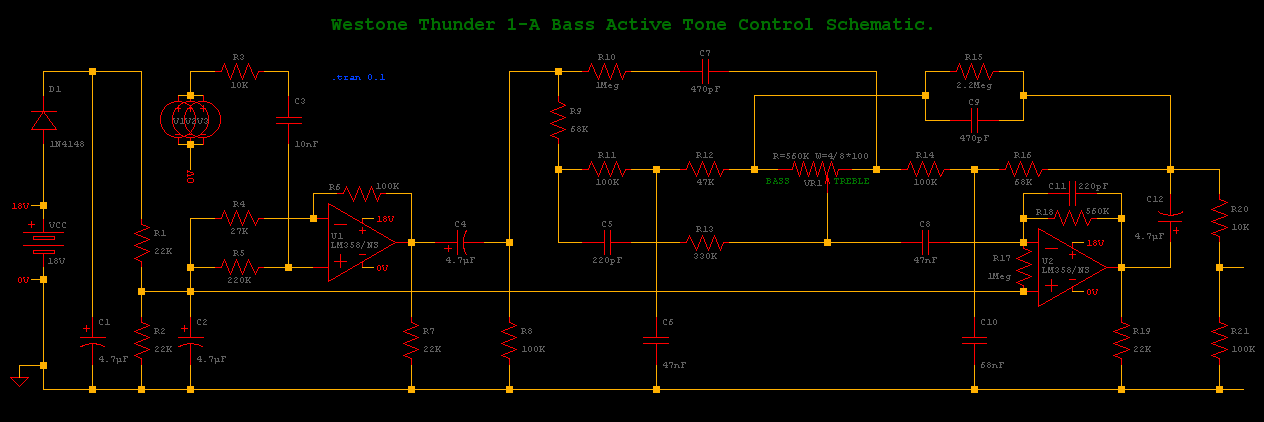
Westone Thunder 1-A Bass active tone control schematic.
          List of components for the active tone control circuit in the Westone Thunder 1-A bass.

          R1    22K                       R8    100K                      R15   2.2M
          R2    22K                       R9    68K                       R16   68K
          R3    10K                       R10   1M                        R17   1M
          R4    27K                       R11   100K                      R18   560K
          R5    220K                      R12   47K                       R19   22K
          R6    100K                      R13   330K                      R20   10K
          R7    22K                       R14   100K                      R21   100K

          (All resistors are 5% except for R15 at 10%. Ideally, use 1% metal film in new boards.)

          C1    4.7µF 35V Tantalum        C5    220pF Disk Ceramic        C9    470pF Disk Ceramic
          C2    4.7µF 35V Tantalum        C6    47nF Mylar                C10   68nF Mylar
          C3    10nF Mylar                C7    470pF Disk Ceramic        C11   220pF Disk Ceramic
          C4    4.7µF 35V Tantalum        C8    47nF Mylar                C12   4.7µF 35V Tantalum

          (Capacitors are listed as found but 35V 105°C electrolytic will be better than tantalum).

          D1    1N4148                    IC1   LA6358                    VR1   500K 'W' taper pot.
|

Backlit board, with schematic component labels added.
|
The circuit appears to be an esoteric variant of the 'Tilt Equalizer' circuit. I'm not sure that my schematic is laid out as well as can be done, but it's topologically correct, and fairly easy to follow. There are additions and modifications that I don't fully understand, but it's enough to be accurate in case of need to modify a board, or make a new one. For a while I could not be sure if this circuit was genius, or hideous, but while it would never do for general tone adjustment, it is excellent at rapidly sculpting a sound for a performing instrument, using a single variable control. Matsumoku used this same circuit, or one with very minor modifications, in most if not all of their Westone guitars for at least ten years. If for any reason the gain must be raised without affecting the tone, this can be done by raising the value of R6. Do not lower the value of R4. While this might seem to do the same thing with less noise, it will destabilise the voltage reference at the junction of R1 and R2. |
|
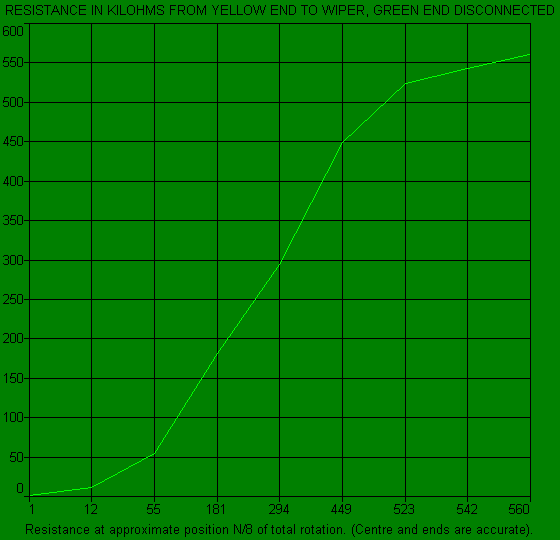
The 500K active tone pot has a W taper and NOT a G taper, so beware of the markings on it if replacing it! A G taper reaches the half-resistance point at 75% of its turn, not at 50% as this one does. Whatever the markings on the pot are, research your suppliers if you need a new one, make sure that you get the right taper. If you can't, use linear, it's probably closer than trying anything else unusual. |
|
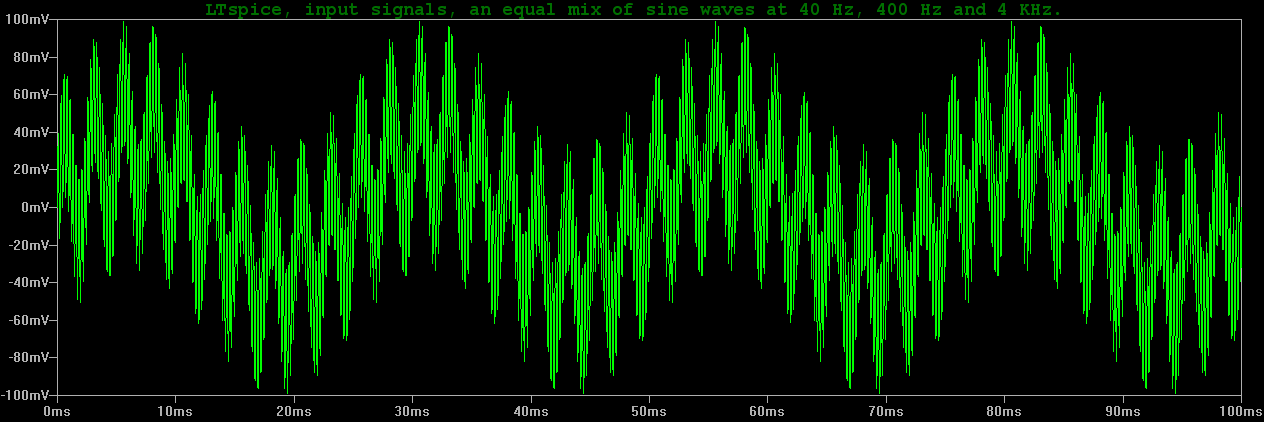
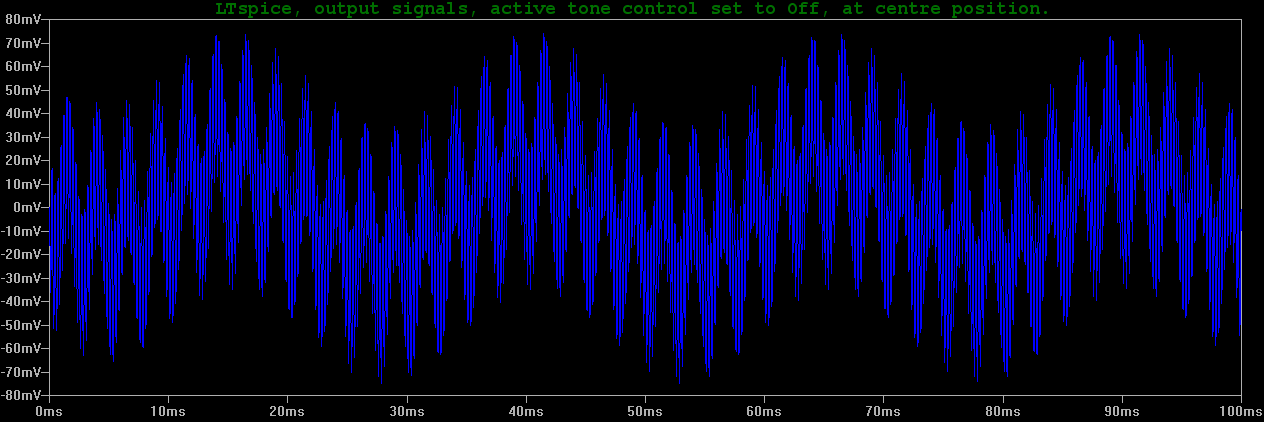
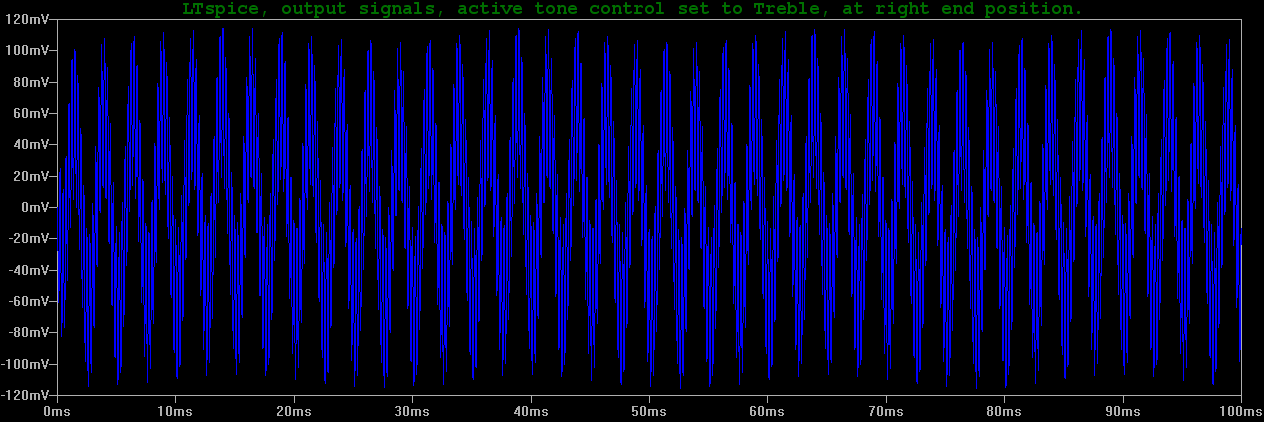
The input used for modelling is a mix of three sine waves of equal amplitude, at 40 Hz, 400 Hz and 4KHz. This makes the output close to a real bass signal, given the simple conditions used, and shows the circuit's response more effectively than using a sawtooth or square wave. |
|
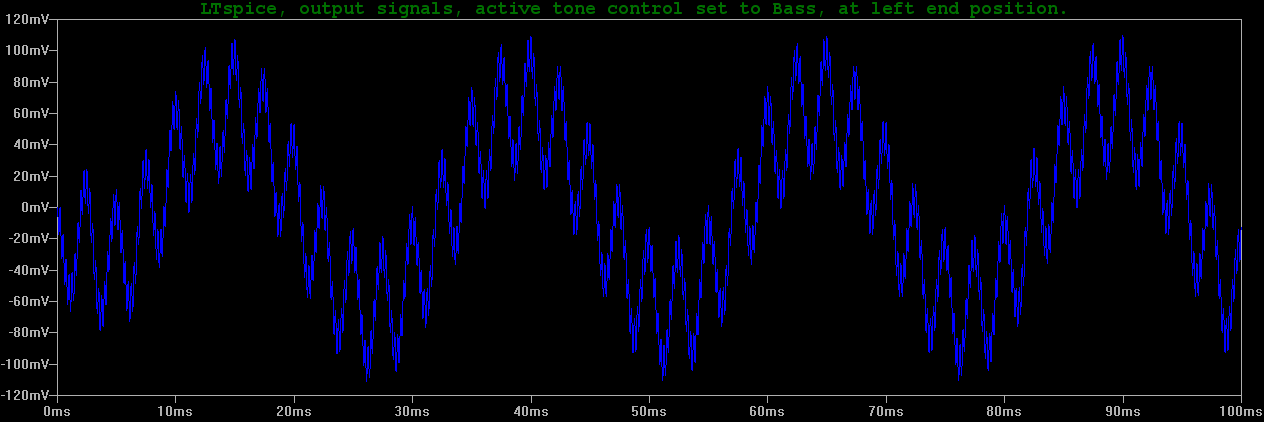
With the bass boosted, the heavy undulations in the signal are stronger than in the input, while faster high frequency signals are strongly reduced. |
|
With the control centred at its neutral (Off) position, the signal is very similar to the original input, though there is a little phase delay and attenuation. Sonically, it is not possible to set the control to an exact copy of the input, but this flaw is acceptable because it's not the largest flaw in an electric guitar circuit, and its purpose, as with any guitar circuit, is to give the largest tonal variation with the lowest cost and complexity in use. |
|
With the treble boosted, the heavy undulations in the signal are almost gone while the mid and high frequency signals are stronger than in the input. While these graphs are based on simulations and not real signals, they are good enough to prove the accuracy of my circuit transcription. If anyone reading this needs to make or modify this circuit, it's important to know that the information here can be trusted. I examined two different Westone Thunder 1-A bass guitars made in 1983, from different sources. Both had original, unmodified wiring and components, so the information here is accurate. |
