DX7-EDITSysEx File Voice EditorFor 6 Operator FM SynthesisersDOWNLOAD HEREThis program needs wxLua v2.8.10.0 which can be found online. It runs on several operating systems. A small UPX-packed wxLua executable for Windows is included here for convenience. It is clean if it arrives intact with this MD5 checksum: C8CB18E29451012B0DB4EDA095BD907E. If wxLua changes, this file will keep the program working. I might not update, as it works fine now. Put wxlua.exe in a system directory, associate the Lua file with it, double-click the Lua file to run it.
NEWS: Soon to be ported to ANSI C and Win32 API. It will be small and fast, and have its own MIDI handling. DX7-EDIT is a DX7 MIDI System Exclusive voice editor. It works with these Yamaha instruments: DX7, TX7, DX5, DX1, TF1 (TX816 module), DX7 II S, D and FD, TX802, FS1R. It is also compatible with the Native Instruments FM7 software and with anything else that can take a standard DX7 SysEx format voice data stream via MIDI. With suitable format conversion, it also works with the Yamaha SY77, SY99 and TG77, but that is beyond the scope of this guide, and this program. It makes editing easy by ordering things on pages that mirror the structure of the SysEx file closely, while grouping things sensibly for visual navigation. To make things even easier, there are few buttons, and there is tooltip and status bar help for each of these, so after a few minutes of use you'll know what everything does. DX7-EDIT also closely emulates the original DX7 voice buffers, and the DX7 power switch. What that means is you never have to save your work except when you want to. The data is virtually crash-proof too, as at least one of the buffers should survive, and all buffers are in standard format SySex. Like the DX7, it remembers the state it was in at shutdown, so starting the program will return you to the current voice or edit session and even to the same page of controls you were last using, and all you need to do is start it, and close it down, to do this. It also means that anyone who was proficient at using the DX7 edit, init and recall buffers for copy and compare techniques and other tricks should find those working as expected here. For those unfamiliar, I'll explain later how these buffers interact. First, some pictures of the main editing surface. All 155 parameters are contained on 4 pages. 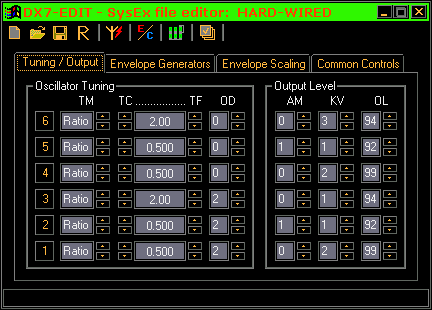 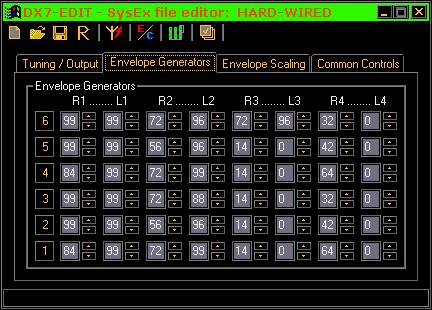 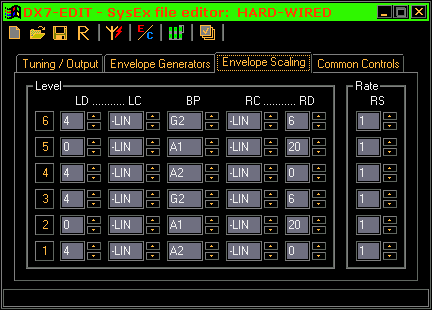 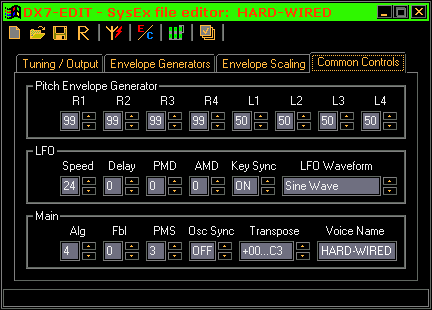 Each parameter is changed either by clicking the 'spin control' buttons, or by the arrow keys, or by the scroll wheel if you have one, or even by direct text entry (which for Voice Name is the only way). This allows very fast data entry, and most people will already be familiar with one of these ways. For those who are not, the closest emulation of the DX7 Data Entry slider is to click the control you want with one hand, then use the arrow keys with the other. Click the buttons on the spin control to emulate the Yes/No buttons, or again, use the arrow keys. Some controls display the value converted from a number to a more complex form, the same way as the DX7 does. For those controls, a direct text entry must be the core numeric value. It is not always obvious what that is, but a bit of trial and error is harmless. This is useful when entering scaling break points from a paper data sheet, for example... Remember that text entry MUST be followed by pressing the Enter key. All other data entry methods directly update the stored value. Note! The Oscillator Tuning display is a special case, being compounded from three controls, Tuning Mode, Tuning Coarse, and Tuning Fine, and although the Tuning Mode control is fully accessible, the other two are only reached through buttons, the display between them is read-only. The program only updates any display after storing its value, so what you see is truly what you get (so long as you remember the Enter key with text entry); it is self-verifying at all times. The edit buffer is saved to disk every time any control is changed, further increasing data security. A DX7 SysEx file contains one other 'parameter', the Device Number. This addresses any one of up to 16 machines, each preset to a different value for reception. This Device Number is part of the SysEx message, thus is saved in the file, or taken from a loaded file. It can also be over-ridden with a new value, preset in the configuration dialog, shown next. After that, there is a picture of what happens if you change the Envelope Display Mode, this being the other change the config settings allow. Changes to the config are only saved if you click the Save Config button, so you can always exit knowing if things are changed. A peculiarity of DX7 envelopes is that they are not easy to understand. There are two logical ways to display them. One is to think of the temporal progression of rate to the associated level. This is useful when thinking about how they work, and is ideal for making sounds, but it's not the only way. Patch sheets usually emulate the voice data structure, putting rates together, then levels. This is awful for programming from scratch, but is ideal when entering raw existing data by hand, so you get to choose which way you need to see them. (Another quirk, not adequately covered in any texts I've seen, is that rates are not times, so it takes less time for a fixed rate to go from level to level, if the levels are close in value. This is not only awkward, it is musically excellent, very useful, and to silence the tiny glitches between two identical levels, set the intervening rate to 72. New machines don't care, but on older ones, this cleans them up a lot. Some of these pictures show examples of this trick.) 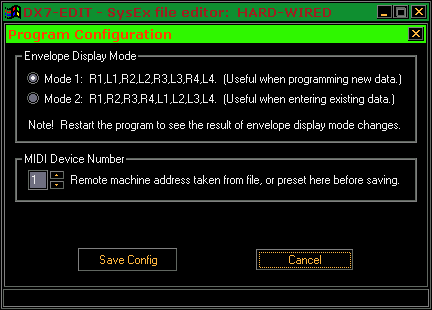 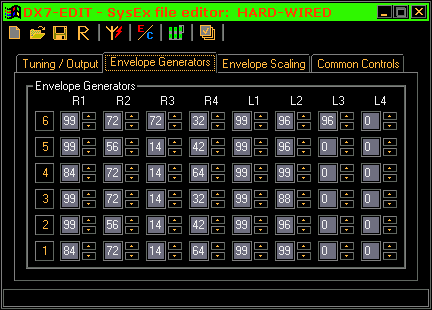 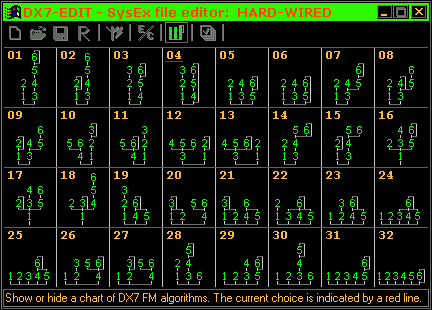 Another vital thing is to know what algorithm you are using, at all times. This familiarises you with them, making it easy to convert a voice to another algorithm when you need it, while keeping the sound the same during the conversion. The previous picture shows the 32 algorithms, and also which is currently used. You can see this at any time while its button is enabled and visible. When editing, you will often want to copy sets of parameters between Operators, especially when converting a sound between algorithms. You might also want to mute one or more Operators to see what effect they have. All these things are done with the six Operator buttons. There are very few controls needed: Double click any button to toggle the Operator's mute state. Left click to copy its parameters. Right click to get a menu that lets you paste the current copy to either the selected page, or to the whole Operator. Note! Double clicking must obviously involve two single clicks, therefore muting or unmuting will also copy the Operator data. Be sure to left click the source Operator whenever you want data, so you can be sure which one you are copying from. The next picture is a Load dialog. A Save dialog looks very similar. As wxLua is very portable, it's likely that the dialogs don't always fit as neatly into the GUI frame as they do here, but such is life. >:) 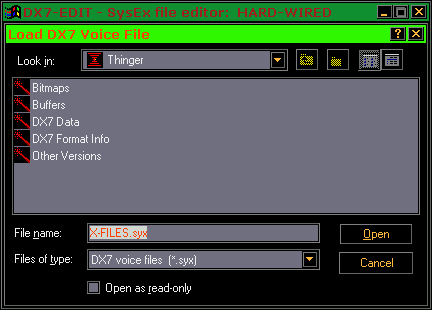 The important thing to know about saving and loading files, is that you can load or save either a single voice, or a bank file, without elaborate controls. The program will know which is which, and handle each correctly so long as the format of the files is correct. There is a lot of error checking built in, and there are some templates and samples provided with the program. A single voice file can be made from the editor or copied from any of its buffers, but a bank must already exist. So long as it does, anything can be done with it. If you load a single voice, it will update DX7-EDIT's controls. If you save, it will directly write to a single voice file, unless you tried to overwrite a bank file. If you select a bank file for either load or save, you'll see this: 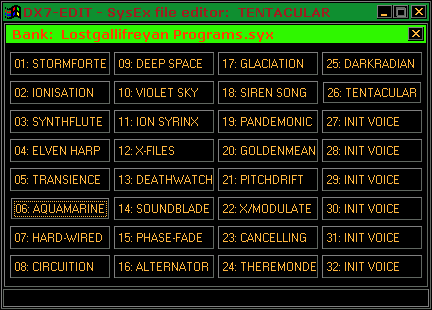 The Bank dialog shows 32 voices. To choose one, click the voice you want to use. Take care! There is no confirmation on saving, it assumes that if you got that far, you know what you are doing. Click the dialog Close button to abort at this point if you need to. The last three pictures show some use of the buffers DX7-EDIT uses to manage voice data. As well as the main buffer, which is entirely automatic, holding a voice for transmission to a remote machine, there are four buffers that can be called at will, at various times, and they interact with each other in a simple but powerful way. While many programs have a simple 'undo/redo' tool, emulated by the DX7-EDIT (or DX7) Compare button, the combination with buffers is far more powerful, and in practise is more useful than a multiple undo or redo tool would be, because instead of retaining every arbitrary move, you save copies of each voice in a bank when you want to, staging a patch's development the way a climber puts pitons in rock. This analogy works, the process need not be linear, you can mark out branching variations easily instead of forgetting where you were even on simple linear progressions as is common with standard multiple undo/redo tools. These buffers are files stored on the disk, so they are also more secure. 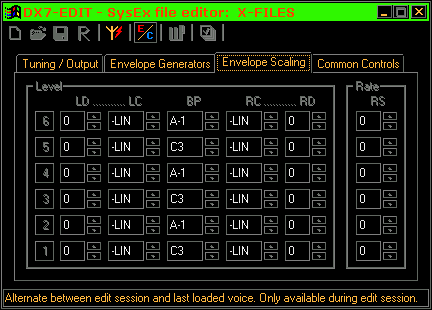 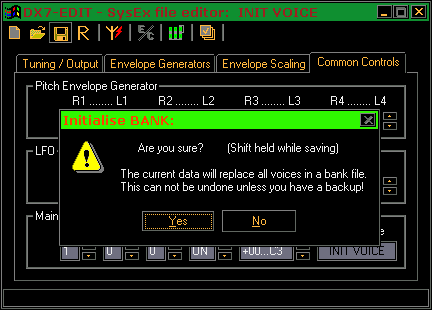 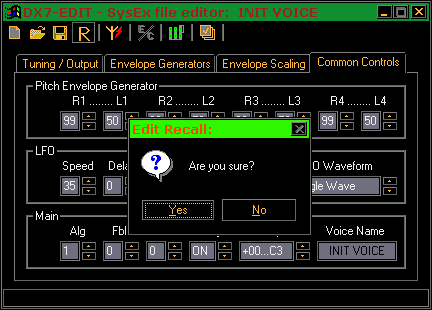 The four buffers that handle user input are Compare, Edit, Init, and Recall. In practise, these handle themselves, but it really helps to know what is happening, as editing strategies can be built on that understanding. The Init Buffer is a default template, with each control 'parked' with a neutral value. While this contains the DX7 default of INIT VOICE, you can always edit that and over-write with your own defaults. (The file is called Init, in the Buffers directory.) Invoking this buffer is like loading any voice, but it bypasses the load dialog and prompts you for confirmation. This is because when you load a voice the current edit session is wiped, although it gets saved for recall if need be. See later... The Edit Buffer is updated every time any control is tweaked, as explained earlier. The Compare Buffer holds the last manually loaded voice. This allows compare using other voices, but is usually just a way to hear what the current voice sounded like before you started tweaking it. The Recall Buffer allows you to recover the last edit session. Note that this means you can load or save (or initialise) any amount of voices and still return to the last edit. You can even start editing a new one, and return, but the moment you tweak a new one, that's a new session, and if you abort it by loading or saving again, the previous session is gone forever! If in doubt, always immediately follow a casual edit with a recall if you want to return to an existing edit. Either that, or first save the original edit session as a new voice. When a voice is manually loaded or saved (or initialised), if there is an active edit session, it is flushed to the Recall buffer, and the Compare button is disabled, signifying a new unedited voice. The new voice is also copied to the Compare Buffer, but an initialised voice is not copied there. This allows a voice to be made from scratch, to emulate the sound of the previously loaded voice with a very different structure if need be. When a loaded voice is first tweaked, the Compare button is enabled, signifying an active edit session and allowing access to the Compare buffer while programming. You cannot change that buffer, you can only hear and see its contents. Almost all controls are disabled at this point, even mutings are reset. This could be improved, but for the first version of this program I want to emulate the DX7 as closely as I can (including the quirk that resets Compare mode back to Edit mode if the system was shut down during Compare mode). It's still a very powerful tool, you can look at each page and compare any parameter, which is better than multi-level undo and redo would be. If you want to revert to the old voice, just reload it. One improvement I intend is a way to copy and paste parts of the original into the edit, to restore groups of parameters in one go. Another is to preserve mutings, so long as the session is active... When you want to return to the previous session, use the Recall buffer. This always holds the last session, even during a new one, until the point where the new one is exited by a new load, or by saving, or by initialisation. Closing the program does not force the close of a session, so if you want to stop but retain the edit, just close the program. It will open exactly where it was when it closed, same as the DX7 does. As well as initialising a voice, you can initialise a whole bank by holding Shift while clicking the Save button. If you want to use the Init Buffer, you have to call that first, but you can use any loaded voice, so you can make a template for the voices you intend to program in that bank, and use that. It fills all 32 voices in the bank in one go. You do get a request for confirmation, but work on a copy, it's a permanent operation. |