NDB Signal FilterNDBscope.zip, Version 1.0, Size: 56,077 bytes. CRC32/MD5 codes: A9039A90/7CE62D87EE56893064BEEF5591AC6606 NDBscope is a small MIDI-controlled audio filter for Windows computers. It runs on all 32 bit Windows, and probably on WINE in Linux. It has been tested and works well on 64-bit Windows 7 and Windows 10. Context for use: NDBscope was built to make it easier to hunt for NDB (Non-Directional Beacon) signals when swamped in background noise. In the unlikely event that this interests you strangely, unzip NDBscope.exe to wherever you want it, and run it. If it is missing its config file, it will make one with default data. More than one copy of NDBscope can be run at the same time from its own base directory and config file, within limits imposed by whatever you connect it to. This HTML page is the manual, so keep a copy of it. The program has a few points of interest, even refinement, but it is the C file I supply with it that will be the most useful thing about it. Audio setup: Start with the defaults in the config file that is created when the program first runs. NDBscope is an early test of audio and a control system I have extended and improved greatly in my later work. It is hard-coded to use 48000Hz as its sample rate, and it defaults to 16-bit audio. Direct editing of the config file (when the program IS NOT running) will let you set 24-bit audio by changing the "Audio_24" value from 0 to 1. Signal controls: People who need an audio filter probably know enough about audio not to need me to spell it out, but I'll describe the controls, and the config settings that aren't accessed directly by the controls. 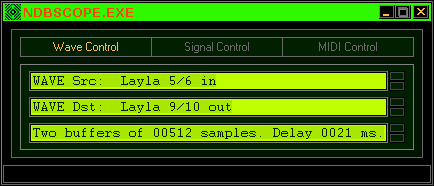 Use this control panel to set audio input and output ports, and set the buffer size for lowest glitch-free latency. Results will depend on the quality of the hardware and the driver code supplied for it. (Unlike the LineTest program, it has no ASIO, but I'd not be releasing source code if it had!) Take care with the external input, to prevent nasty (and potentially dangerous) surprises when switching it on when an amplifier is set loud, because the program defaults to using full level transfer of audio signals. 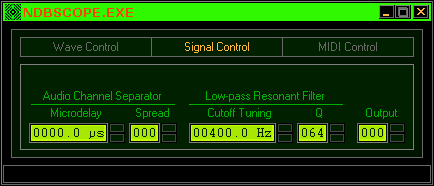 Use this main panel to adjust signal parameters in realtime. The controls have a smooth operation like potentiometers. Mouse control by click-and-drag upwards or downwards will sweep the value through its range very quickly because there are only 128 possible steps. The filter tuning range is calibrated to exact values, but finer tuning is not possible. Quick setting of arbitrary values can be done by entering a number (0~127) and pressing Enter, but it's easy to use the controls as proportional devices like any control knob in hardware. To help with this, each control will take MIDI input so a hardware device can be set up with a dedicated controller for each parameter. The up/down arrow keys can also be used for adjustment of any control. Microdelay and Spread give a 'pseudo stereo' effect. It is crude, but it helps ears and brains focus on weak pitched signals in enormous levels of background noise. The concentration needed to do this can result in detections no filter will allow on its own, and adjusting these controls can ease fatigue, if nothing else... People who need to listen to RF signals for long periods may find this indispensable. The central controls are for Filter cutoff tuning, and Resonance. It's wise to keep the resonance (Q) down most of the time, but when hunting for a weak signal, a sharp increase in resonance, and careful tuning, can turn a vestigial murmur into an owl-like hoot, an effect well beyond the AF filter capability in most communications receivers. The aim with these controls, is to make them very easy and fast to use, because signal conditions may change very rapidly and in unpredictable ways, so the ideal use of this tool is almost like a performing instrument. The last control does nothing. Silly, I know, but this IS an early program, and anyone extending it may well want to start there, figuring out a way to set AF amplitude gracefully. I solved this in my later work (including LineTest), but I'm not giving up all my secrets... 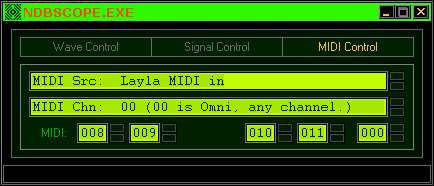 The third and last panel sets up MIDI input and channel number (Omni means it responds to any and all of 16 channels). The settings on the last row correspond exactly to the controls on the main panel. The 'Continuous Controller' number chosen must map to that of some hardware control you intend to use. This obviously extends the metaphor of 'performing instrument', and this IS the best way to use the filter, though the panel controls are designed to be as effective as possible. Technical notes: The C file will be extremely useful for anyone developing high performance digital audio on Windows. Those who have tried, will know that the API methods for 'callback' are a choice of three: Window, Function, and Thread. Window callbacks are BAD because windows receive lots of messages, not just audio-related ones. That leaves the other two, but there is a problem... which to use?! Nearly EVERY guide, and every example, that I ever saw, insists on one OR the other, leaving a serious problem unsolved. The callback FUNCTION is the best for high performance because it happens at 'interrupt time', i.e. there is no delay, and there MUST be NO DELAY, because the audio will glitch and break up disastrously if there is ANY, even a few microseconds or less. This means only RAW calculations can be done there, stuff whose calculation time is easily predictable. It is not even safe to set the audio buffers under driver control in this context! For this reason, most people settle for the callback thread, a worker thread that only handles audio messages, handles buffering, etc. This works, but the cost is mediocre performance. It's WAY better than a callback window, but it still sucks. Threads also require careful synchronising, and this often makes a coder reach for things like 'CriticalSections', or 'Mutexes'. DO NOT DO THIS! Instead, go hunt for a document called "Realtime Waits For No-one", by Ross Bencina. Read it all. Twice. You'll not regret any time spent on that one. It will save you PAIN, never mind time... Even if you read NOTHING else on the subject, read that. I did, and it led me to the inescapable conclusion (though I don't think he spelled it out), that BOTH callback methods are needed, and not just ONE. First, you use a callback function to do the raw calculation, filling (or reading from) the current buffer that is ready for you. The INSTANT you have done this, you POST (not SEND) a message to your thread, which punts the data in the driver's general direction in its own time, but because the heavy work is ALREADY DONE, this is extremely fast! The result is blazing performance speed, glitch-free awesomeness. And because you POST the message to the thread AFTER finishing your raw buffer access, there is no possibility (without a time machine) of there ever being a synchronisation error. The method is extremely simple, so why it is not part of standard texts I do not know, but it is the basis of my methods, and those include a 128-voice polyphonic multi-timbral synthesizer based on phase modulation with 8 'operators' per voice (with a few sonically interesting realtime waveshaping methods that even Yamaha do not know about), each with a complex multistage envelope generator, all 8 combined with a complex realtime polyphonic modulation system for performance control. This is an extremely demanding use for any audio system, and in this case, the method is not found wanting. About the filter... It's based on something a guy in Finland, Olli Niemitalo, posted on a web page discussing emulations of the filter in the MiniMoog synthesiser. It's not a faithful imitation of the sound, but the ease and speed of calculating realtime use of the filter was essential for its use here. He was very modest about it, he said it was just a basic idea in maths, but to me it was magic because it was the only variant I could understand, and adapt to my own way of working. Translating a complex mathematical form to efficient 'inline' code statements is not an easy task, and his vision of how to do it was vital to the success of any use I ever had for it (including an extended emulation of the filter in the Yamaha SY99, for use in my main synthesiser software (not yet released). It let me play it by ear, instead of agonising over the technical detail, though optimising it meant I had to pay attention to that too... I have what may be a terminal illness, so I'm rushing to get my work online ASAP. How much will ever be fully released will depend on circumstances, but releasing some definitive source code that exemplifies the method seems to be wise, while I have time, so have at it! Don't let it go to waste! Just give credit where it's due (I do), and point people to my web site in case there's stuff they want from it. It will be around for a while after my death, but nothing lasts forever. The thing is, anything DONE can live again somehow, which is the point of putting this stuff out there. USE it, it's yours now. |