ORG-LinkGeneral purpose serial link tool.For all variants of Psion series II Organiser.
ORG-Link.zip, Version 2.0, Size: 37,868 bytes.
CRC32/MD5 codes: 350A179C/22BB64738AE827BA7EBAB8E910B2A1D4.
ORG-Link exists to replace the Psion programs CL, Make, and Unmake and many of the files that went with them. It avoids difficulty with file paths and serial ports that DOS-based programs have in Windows. Port access often fails, if not immediately then soon afterwards. Any other activity on the computer demands time from the CPU. Data flow breaks and times out, leaving another 40-minute wait for a UV formatter to make a data pack reusable! Something had to be done to remove this source of pain. Psi2Win was written for the same reasons, but ORG-Link is much smaller and does a lot more. It was written in C using Win32 API calls, so it would work even on the smallest embedded Windows OS. It works on W98, WXP, W07, and W10. It works on 32-bit and 64-bit Windows, but it will always be a 32 bit program. ORG-Link works with BIOS-controlled serial ports, and also with Olivier Gossuin's USB Comms Link and StarTech's ICUSB2321F USB to RS-232 converter. Both of those use FTDI components and will work with the same device driver. Other devices have not been tested. The USB Comms Link will power an Organiser but has a fragile connection. The StarTech device is more robust and will allow any original Comms Link to work with it (if adapted to a DE9 connector), but it will not supply any power.
FTRAN and FILE modes are fully supported. They are started on the Organiser, there are no buttons on ORG-Link to control them. FTRAN transfers Organiser files. It uses the Psion protocol for Transmit or Receive, as do Comms link functions XTSEND: and XTRECV: which do the same thing but for more Organiser file types. FILE mode also handles files, using a file pointer on the computer to reach any byte in a file with a size as big as a 32 bit file system can address. BOOT mode is fully supported and extended to combine other functions and make them easy to use. All functions related to BOOT mode are grouped together as four pack buttons and four buttons on the left end of the toolbar. To use one, start it with a click of a button on ORG-Link, then browse for a file if needed, then select BOOT from the Comms Link menu on the Organiser and press EXE. It will ignore any filename entered and use inbuilt code for the requested task. Watching both machines as the process occurs will make it very self-explanatory what to do, and what is happening when you do it. To use an external boot file, you can ask for it by name at the BOOT prompt, and you will get it in the normal way if you have put it in the same directory as ORG-Link so it can find it. Once an action is started, all controls except the emergency stop button, and the standard Windows control buttons, will be disabled until the action is done, to prevent accidents during a transfer. Visual cues to the current state are given with more detail than other programs give. PLAN mode is also supported for importing and exporting spreadsheets. Unlike CL, there is no support for Lotus. ORG-Link uses tab separated text files which most programs can use: a choice of Formula or Numeral. Formula files import or export spreadsheets with formulae intact. They also contain numeric formatting as a four-character arithmetical expression on the end of a number or formula in any cell that was formatted in the Organiser. These will survive careful editing in other spreadsheets, and should be preserved! They are converted to native methods by ORG-Link when the file is re-imported. When exporting a spreadsheet for literal printing of displayed values, choose Numeral on the menu. Numeral files are plain text with the appearance of formatting where possible. When viewing or printing them, use a fixed width font and tabulation at 16 characters. There must be enough for the maximum of 12 allowed in the Organiser, with space between columns. Row and column formats and widths are NOT used because transferred data only carries cell contents and formatting. ORG-Link can't create what's not there, but it does make full use of what it gets. EXIT mode is not supported. It is ignored. ORG-Link is a server, it's going to sit there ready until the user stops it directly by acting on its own panel. Given that it's extremely likely that anyone linking the Organiser and a computer will be able to reach both machines, this is wise because if the Organiser says 'EXIT' to the original CL program it could never restart CL to be ready for more work.
Most of the controls start functions that use BOOT mode, i.e. they use the Psion protocol, a negotiated packet exchange system, even if the Organiser Comms link setup has 'Protocol' set to 'None'. The only exceptions are the relay tools, which MUST have the protocol set to 'None'. Take care that this detail is observed and set correctly to do useful stuff because while otherwise safe, the results will be unimpressive at best. Similar care should be taken when using Comms link OPL functions. LPRINT and LINPUT$: will use raw data bytes, but XTSEND: and XTRECV: can use the Psion protocol (enabled in the Comms link setup), which uses binary data that may be confusing if text was expected!
The four large buttons do exactly what the text on them says. Their actions replace the Psion MAKE and UNMAKE pack handling tools, and replicate their action precisely, but with two vital differences: 1, Psion limited this to pack C only, but with ORG-Link you can select pack B if you want, avoiding the need to risk physical and electrical stresses by moving packs when you don't want to; and 2, there is no 'AMAKE', you cannot append to a pack other than copying files to it in the normal way. It's easier, and safer, to make a clean pack image in one go, with BLDPACK. Add new files to that, then send the OPK file to a pack with ORG-Link. This method also prevents loss of space on EPROM or Flash packs caused by replacing old files.
The toolbar has seven tool buttons and a link state indicator which glows green if ORG-Link has opened a com port. Four of these buttons are grouped together. These control BOOT mode functions. The others will be described later. The first two tool buttons replace the RECV and TRANS methods provided with CL. They work with pack A, the internal memory. They save and restore top level menus (except where bootable code manages its own menu entries), along with files, alarms, diaries, calculator memories, sounder mute state, and a few other useful details. Unlike the original tools, ORG-Link will allow you to name the files and locations used for your backup files. Just remember that they MUST be reserved for use with the same type of Organiser, ideally the SAME Organiser, to work properly, but this is a very effective way to clone a system across multiple machines of the same type. This does not extend to imaging 'allocator cells' and installed resident machine code programs, but in future it might because it's definitely possible to write code to extend these methods to do it. The Clock button will set the time and date on any Organiser II machine. It uses a method that all of them support, and it is deliberately designed for consistency, i.e. 24-hour mode on all machines, and no 'daylight saving' time. This is to make it extremely easy to know what it will do. If your computer is set for local time, daylight saving time, correct locale, etc, then you have the time as you need to see it. The time sync tool in ORG-Link makes sure that what you see is what you get. By using it, you get the exact same time displayed on the Organiser. The Emergency Stop button is designed to let you stop boot code transfer and restore the standby state so ORG-Link will quickly respond to user input if something goes wrong, or 'hangs', or if you just changed your mind in mid-progress. Wherever possible it will do the same for the Organiser at the same time. This detail removes a lot of the inconvenience associated with use of the original tools. It signals the Organiser in a way that causes the most graceful exit possible with existing code, and will not result in data loss or other disturbance. There may be conditions where it will not work, and you'll have to force the program to terminate, but if that needs to happen there are probably more serious problems that are hard to predict or set up on purpose for testing. If this happens, check the hardware. High Baud rates with extra long cables, or unusual DIY connections can sometimes cause such errors by totally confusing the system with malformed bytes. If you have good connections and power, this is very unlikely to go wrong.
The port relay connects two serial ports, bypassing all other operations. It acts like a cable, but it can use a different Baud rate at each end. It is bi-directional, passing data and flow control signals at intervals of 10 milliseconds or less. The port relay carries raw bytes. Set the Comms Link protocol to 'None'. If hardware conditions cause errors, the XMODEM protocol may help. It is slower, but has better error checking than a raw byte transfer. Using the Psion protocol will not work when a relay is active. To stop the relay, use the relay button again, or press the ESC key. To explain why the port relay exists, it is best to use examples, not instructions. Many GPS modules use Baud rates that are too fast for a Comms Link (higher rates may work if future Comms Links use parallel data flow in the Organiser). A standard 1 Hz GPS position update allows at least three NMEA sentences at 9600 Baud so the Organiser is a good host, but a GPS module may allow only 8 changes of settings in its lifetime! Even if it accepts temporary settings, you need different Baud rates to set them. The relay allows software testing at the native rate before committing any permanent changes. Not many people will need this detail, but it shows how this difference in Baud rates can solve problems. Even at equal rates in the standard Organiser range of 9600 Baud or less, the ports for each end of the relay allow easy development of Organiser software on the PC, transferred to packs on the Organiser, with the other serial device permanently connected for testing. There is no need to change plugs, cables or pack slots during development. This reduction of distractions makes a huge difference when programming complex software. A more basic use of the relay is to print text from the Organiser onto paper. Older machines will do this directly, but even in a modern Windows OS a USB printer can be shared and made to look like it's attached on a serial port by using the command NET USE COMn: \\127.0.0.1\Printer /PERSISTENT:YES where 'Printer' is replaced by the name of the installed printer intended for use, and 'COMn' is replaced by COM1 or COM24 or whatever number you want, so long as it matches what is selected in the ORG-Link configuration. Another use of the relay is to link ports with high or different Baud rates when an Organiser is not used. ORG-Link uses fast 16-byte buffers so it will solve problems where a general purpose tool is needed, even if the remote hardware is an 8-bit device (like the Psion Organiser II) with a buffer no larger than 256 bytes. The same applies to the file relay described below. When using the port relay, set the computer's flow control to 'Hardware' for all ports used, and set those on external hardware to 'RTS/CTS' flow control. XON/XOFF will probably work, but use RTS/CTS if possible. Don't use DTR/DSR because Windows does not use it. To avoid overwhelming the flow control with too much data, keep the Baud settings for each port similar if possible, but with short sequences of bytes this probably does not matter.
The file relay is a better way to print from the Organiser because it captures raw data to file instead of routing it to another port. If data arrives, closing the relay (by clicking the button again, or by pressing the ESC key) will open the relay capture file in a program associated with it, if configured to do so. It is also possible to end the relay capture and open the file automatically. (See the 'FileTerm' detail in the config description below for more information). The advantage of printing from the relay file is that all the methods of a good text editor can be called on to do it. This is much more effective than trying to emulate that method directly, and it lets people make their own choices of what to do with the file.
The Config button accesses most of the settings in the program with a few different config panels. If the Close button or the Alt+F4 keys are used while any config panel is showing, it will exit to the main panel immediately.
The link state indicator glows green when ORG-Link connects to the main comms port. A similar indicator exists for the relay port on the first config panel, but there is a special detail for the main indicator: clicking the 'Link state' text will force the link to be switched off and on again, to reset it. This will be prevented during any operation that uses the link, but it is useful to do this when ORG-Link should be waiting to connect, if a USB serial adapter or its cable was removed and replaced. Setting a new port on the first config panel would do this too, and may even be needed at times, but a USB plug can often be erratic or easily pulled, so for convenience, this method exists to restore the link if that ever happens.
The config file is automatically generated the first time ORG-Link is run, if it is not there already. The following small images show the config panels with some settings used while testing the program. The large image below shows the same settings, and also some defaults made when a new copy of ORG-Link was started. 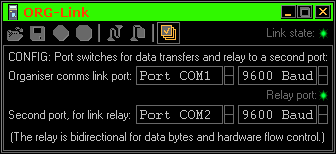  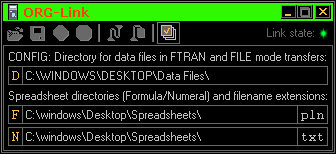  The config file stores many things to make it easy to work with ORG-Link for long periods, or to recall a working state months or years later. When working with old code, this helps memory of past events. The colour scheme can be changed so if you have vision problems it may help, and dislike of existing colours need not prevent you from using the program. It remembers where you put it onscreen. To centre it, put its top left corner beyond the top and left of the screen, then close it. Next time it runs, it will be centred. Windows 7 prevents such positioning beyond the top left corner, but setting 'Position=-1' in the config file will restore it to the centre position next time the program runs. Config panel 1 allows COM port numbers from 1~32, enough to find one on a system with lots of ports already in use. The port should be set as fast as possible up to 9600 Baud, and must match the value selected by the Organiser's Comms Link setup. Faster settings are possible, but should be used carefully and only for relays, or if future Comms Links allow it. The relay port can also be disabled, and always will be if you try to set the main port to the same port that was selected for the relay port. The main port always takes priority. If you try to select a relay port that is used for the main port, the main selection will NOT be disturbed, the relay port selection will jump to the next number in the list. If the second port can be opened, the port relay indicator will glow green. Whatever is connected externally, make sure the Baud settings match for the ports used, and make sure that your hardware and power are in good order if you want reliable transfer at high speed. Pressing the ESC key will exit to the main panel. Config panel 2 sets the path to the file relay's data capture file, and to the program associated with it, to open it when the relay is switched off. The small buttons with orange letters will open a file dialog to locate a file, or its path can be entered directly into the text field. Direct editing of text must be ended by pressing Enter. The text will be selected to confirm the edit. The file termination character is also set here, but is best left at its default of 26. More information on its use is described in detail for the 'FileTerm' setting, after the large image of the config file, below. Pressing the ESC key while editing text will restore the last saved text. The next press of the ESC key will exit to the main panel unless another text field was selected first. Config panel 3 sets directories for data and spreadsheet files. Pack file paths are set by file dialogs that open when the pack control buttons or the Load and Save tool buttons are used, but transfer modes started on the Organiser don't do this. Their location defaults to ORG-Link's own directory, and may need changing. Modes FTRAN (full file transfers) and FILE (random access in a file on the main computer) will share a common data directory, and PLAN mode transfers can have their own directories and file extensions for safe organisation of spreadsheets without risk of overwriting one type with another having the same name. A path is set by clicking the orange letter to the left of its text field and browsing to it and clicking the 'OK' button, or by editing the text and pressing Enter. The specified directory must exist. There will be a warning if it does not. Always press the Enter key after text entry to change it. This also applies to spreadsheet file name extensions. A directory path always includes a trailing backslash to indicate that it is a directory, not a file, even if the backslash was not entered. The ESC key acts as described for Config panel 2. Config panel 4 isn't a config panel. It is a version of the web site's main page image, and putting it here is better than wasting a toolbar button's space and code just to show a way to identify the program and its maker. The config file can be directly edited too, if ORG-Link is not running when you do it. Most settings are edited in config panels, but it's wise to be familiar with the file details. The last line explains itself, bearing in mind that 'salvage' just means copying back anything that you know is NOT broken. 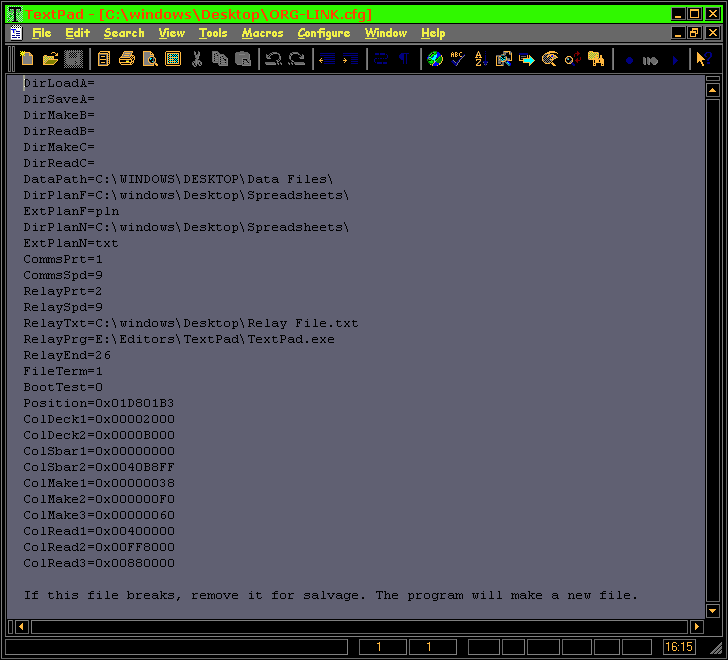 Some settings are best left to their defaults even if you know what you are doing, unless you have a specific reason for changing them, and some of those will need direct editing of the config file, e.g. interface colour editing, and there are two specialised settings described below. FileTerm, set to 1, adds a final character (normally ASCII code 26) to OPL files to mark the end when transferring them back via the Comms Link menu. If set to 0 it will not add the character. Either way, the file transfer will work with the Psion protocol (binary), but if receiving OPL files with ASCII (text) transfers, the termination character allows the Organiser to know automatically when transfer is complete, so if you want files to be transferable with any terminal emulator, leave FileTerm set to 1 when transferring them to the computer using ORG-Link. The file relay also uses this character. If it's not in the incoming data, nothing happens until you manually stop the relay. If it is, the relay will stop automatically and open the file in the associated program if one is set to do this. FileTerm is used to set whether or not to include the termination character in the relay capture file, but it will never add one, it only includes one if it's there already. BootTest is extremely useful if you're experimenting with Organiser machine code called from a computer. DO NOT do this on an Organiser that wasn't freshly powered for this activity! Data loss WILL happen. If you know the territory you won't need this warning, but the aim of ORG-Link is to help those who are not familiar, to get there easily. What BootTest does is bypass the checksum tests in ORG-Link (the Organiser does not do these tests), so you can write and edit code without worrying about the checksums. When BootTest is set to 1, ORG-Link tells you those on its title bar. Ignore them till you need them, then copy them to the correct positions in your code, reset back to 0 to restore the protection against accidental corruption of your code (and the Organiser).
The external tools needed to support use of ORG-Link are few, but vital. Most if not all are command line tools, but as they are limited to local file activity they will not have trouble with port accesses in Windows, the likes of which ORG-Link exists to solve. These tools are OPLTRAN.EXE or ATRAN.EXE, to translate OPL code to OB3 files which contain compiled code and optionally the OPL code too. BLDPACK.EXE and SPLITOPK.EXE are needed to make pack images from these files, and to restore individual files from pack images once made, or after ORG-Link has read the pack. With a few boot files and some effort with machine code, there is likely nothing on a Psion Organiser that you cannot do with this method. The deeper you go, the more you'll need the documentation to help you, but it's all available, either from Jaap Scherphuis' site, or from Boris Cornet's site. Styles differ but they share a lot of content in common. More help can be found at Martin Reid's site. Martin helped with many of the new ideas in ORG-Link, and especially in extensive tests of the results. These Psion machines are unusually well documented, so I'm trying to maintain the standard here too! Psion XP and LZ emulators exist, but they do not emulate the Hitachi CPU's machine code or the low level hardware methods. ORG-Link exists to make using a real Organiser easier than using emulators, using all that a modern computer can do to help make the best of the Organiser itself, because those machines will always be a standard to judge all others by, in terms of power to do things while demanding very little in order to do them. |
